16 August 2025 · 5 min read
Flutter In-App Purchase Verification With a Node.js Backend
How to handle in_app_purchase in Flutter and verify iOS and Android purchases on a Node.js backend, with the product table, purchase stream and token refresh code.
This post covers how to do in-app purchases in Flutter in a secure and stable way. I wrote it because I struggled when I implemented this myself and had to research a lot of foreign sources. The package I used in my app was also on an old version, so some functions had been deprecated in the new one and I had to fix them. Here is the approach with the best practices I ended up with.
The Flutter package for purchases is in_app_purchase 3.2.3.
For backend verification I use Node.js, but you can do it in any language. For iOS purchases I verify tokens with the @apple/app-store-server-library package. It also exists for Swift, Python and Java, and I'd guess there are unofficial ports for other languages. On the PHP side I use hoels/app-store-server-library-php for verification. What I cover here is how to manage the purchase. For cancelling refunded purchases you can get help from GPT.
Why backend verification is needed
- Security: client-side verification alone is not enough, because anything done on the client can be manipulated. Whoever manipulates it can make themselves look like someone who bought the product.
- Protection against fake purchases: verify the receipt or token from the purchase on the backend to check that the user really bought the product.
- Subscription tracking: manage subscription state in one central place, so a manipulated request cannot add information it shouldn't.
Flutter side: product management
First I create a table in the database for the products I created in the stores. It lets me store product metadata and also the things the client needs, such as whether a product is active, its order and the purchase date. Here is the table I created in MySQL as an example.
CREATE TABLE `IapProducts` (
  `Id` tinyint(4) NOT NULL AUTO_INCREMENT,
  `StoreProductId` varchar(100) DEFAULT NULL,
  `WebsiteProductId` varchar(100) DEFAULT NULL,
  `Name` varchar(1000) DEFAULT NULL,
  `Description` varchar(1000) DEFAULT NULL,
  `Price` int(11) DEFAULT NULL,
  `IsCurrentPremium` tinyint(1) DEFAULT NULL,
  `IsActive` tinyint(1) DEFAULT 1,
  `EndDate` date DEFAULT NULL,
  `OrderIndex` tinyint(4) DEFAULT NULL,
  `CreatedDate` timestamp NOT NULL DEFAULT current_timestamp(),
  PRIMARY KEY (`Id`)
) ENGINE=InnoDB AUTO_INCREMENT=1 DEFAULT CHARSET=utf8mb4 COLLATE=utf8mb4_general_ci;
I keep both StoreProductId and WebsiteProductId because I sell on the website as well as in the mobile apps. That way I can map the website's product to the store's product code when I need to. Adjust it to your needs. The initialize part on the Flutter side:
Future<void> initialize(BuildContext context) async {
  try {
    // First get the active products from the backend
    final response = await _paymentProvider.getIapProducts();
    if (response.data == null) {
      return showSnackBar(
        context: context,
        message: response.errorMessage!,
        type: ContentType.failure,
      );
    }
    iapProducts = response.data!;

    // Start listening to the purchase stream
    purchaseSubscription = inAppPurchase.purchaseStream.listen(
      (purchaseDetailsList) {
        _handlePurchaseUpdates(purchaseDetailsList);
      },
      onDone: () {
        debugPrint('Purchase stream done');
        purchaseSubscription?.cancel();
      },
      onError: _handlePurchaseStreamError,
    );

    await _checkStoreAvailability();
  } catch (e) {
    debugPrint('PaymentViewModel initialization error: $e');
    _setAvailable(false);
  }
}
Checking the store and loading products
Future<void> _checkStoreAvailability() async {
  final isStoreAvailable = await inAppPurchase.isAvailable();

  if (isStoreAvailable) {
    await _loadProducts();
    await _restorePurchases();
  }

  _setAvailable(isStoreAvailable);
}

Future<void> _loadProducts() async {
  try {
    // Use the store IDs of the active products from the backend
    final response = await inAppPurchase.queryProductDetails(
      iapProducts.map((e) => e.storeProductId!).toSet(),
    );

    if (response.error != null) {
      throw Exception('Could not load products: ${response.error}');
    }

    _products = response.productDetails;

    // Sort by the orderIndex from the backend
    _products.sort((a, b) {
      final iapProductA = iapProducts.firstWhere(
        (iap) => iap.storeProductId == a.id,
        orElse: () => IapProductModel(
            name: '', description: '', price: 0, orderIndex: 999),
      );
      final iapProductB = iapProducts.firstWhere(
        (iap) => iap.storeProductId == b.id,
        orElse: () => IapProductModel(
            name: '', description: '', price: 0, orderIndex: 999),
      );

      return (iapProductA.orderIndex ?? 999)
          .compareTo(iapProductB.orderIndex ?? 999);
    });

    notifyListeners();
  } catch (e) {
    Alerts().showWarningDialog(context, "Could not load products!", e.toString());
    rethrow;
  }
}
This approach gives you central product management, ordering in the UI by orderIndex, control over product descriptions and prices, and a product state that is independent of the store.
Purchase stream and purchase handling
The stream we created listens for changes in the purchase state. It catches every change from pending to completed.
// Start listening to the purchase stream
purchaseSubscription = inAppPurchase.purchaseStream.listen(
  (purchaseDetailsList) {
    _handlePurchaseUpdates(purchaseDetailsList);
  },
  onDone: () {
    debugPrint('Purchase stream done');
    purchaseSubscription?.cancel();
  },
  onError: _handlePurchaseStreamError,
);
Buying a product
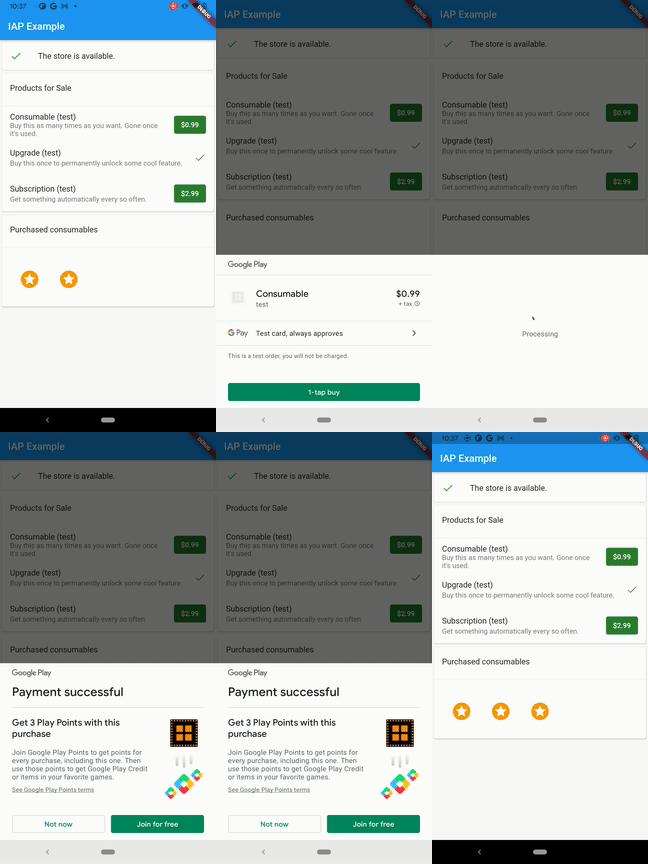
When the user taps the buy button, the frontend calls the buyProduct method. The buyConsumable and buyNonConsumable methods of the in_app_purchase package run the purchase flow on each platform (opening the right screen, entering store details and paying, see the GIFs below). When a purchase goes through, you will see the _handlePurchaseUpdates(purchaseDetailsList); method we listen with above get called. Note that in-app purchase does not work in the iOS simulator. Test on a real device, or on the macOS build of your app if you have one. To try free trials on Apple devices you also need to create a sandbox account.
Future<void> buyProduct(ProductDetails productDetails) async {
  try {
    final purchaseParam = PurchaseParam(productDetails: productDetails);

    if (productDetails.id.contains('consumable')) {
      await inAppPurchase.buyConsumable(purchaseParam: purchaseParam);
    } else {
      await inAppPurchase.buyNonConsumable(purchaseParam: purchaseParam);
    }
  } catch (e) {
    debugPrint('Purchase failed: $e');
  }
}

Handling purchase states
At this point the content arrives as a List<PurchaseDetails>. It is a list because there may be several previously purchased products and you may want to manage them.
void _handlePurchaseUpdates(List<PurchaseDetails> purchaseDetailsList) async {
  for (final purchaseDetails in purchaseDetailsList) {
    await _processPurchase(purchaseDetails);

    // Complete the purchase if needed
    if (purchaseDetails.pendingCompletePurchase) {
      await inAppPurchase.completePurchase(purchaseDetails);
    }
  }
  notifyListeners();
}

Future<void> _processPurchase(PurchaseDetails purchaseDetails) async {
  switch (purchaseDetails.status) {
    case PurchaseStatus.purchased:
    case PurchaseStatus.restored:
      await _handleSuccessfulPurchase(purchaseDetails);
      break;
    case PurchaseStatus.error:
      _handlePurchaseError(purchaseDetails.error);
      break;
    default:
      break;
  }
}
A successful purchase
Version 3.2.3 of in_app_purchase has a small bug. On iOS purchases the status comes back as PurchaseStatus.restored, so you can write a special case for iOS. I first check whether the user already has that membership. Then I filter the purchaseDetails from the purchase against the list we got from the database, which makes sure the product is active. The reason for _runPurchaseSingleFlight() is this: if the JWT expires during the purchase and the app goes to get a new token with the refresh token, all purchased or restored products should share a single refresh to get the new JWT. That prevents unauthorized errors caused by a race condition. If you check the user with a different auth method, you don't need it.
Future<void> _handleSuccessfulPurchase(
      PurchaseDetails purchaseDetails) async {
  if (!_pastPurchases.any((p) => p.productID == purchaseDetails.productID)) {
    _pastPurchases.add(purchaseDetails);
  }

  final iapProduct = iapProducts
      .firstWhereOrNull((i) => i.storeProductId == purchaseDetails.productID);

  // In in_app_purchase 3.2.3, new iOS purchases come with
  // purchaseDetails.status = PurchaseStatus.restored instead of PurchaseStatus.purchased,
  // so the PurchaseStatus.purchased check is not done for iOS (it is for macOS)

  if (iapProduct != null &&
      user?.userProducts?.contains(iapProduct.websiteProductId) == false) {
    final String? websiteProductId = iapProduct.websiteProductId;
    if (websiteProductId != null) {
      // Add to single flight to prevent a race for the same product
      await _runPurchaseSingleFlight(
        websiteProductId,
        () => _completeUserPurchase(purchaseDetails, websiteProductId),
      );
    }
  }
}
Backend verification
A common way to verify payments on the backend is to pass the payment details through a queue and handle the process asynchronously. What I show here is synchronous: send the payment to the backend, wait for the response and continue based on it. Log the requests and responses, so that when something fails you can see which user sent which request and got which response, and tell the customer if needed. You can keep logs on both the client and the backend, depending on what you need.
If the purchase is verified on the backend, you may need to write that into the user's token, because you may be reading user_products from the token. You may also need the token's data when restricting route access on the backend. For a better experience after the purchase, the user's token needs to be refreshed. Otherwise you would have to log the user out and in again so a new token is created and they can see their products. You can use the refresh token to issue a new token. Here is the code for that.
Note: make sure you handle compensating transactions for the operations you do in code. The code here has no extra database operations (issuing an invoice, sending mail), so no extra logic was added.
// Save to the database
final databaseResult = await _paymentProvider.saveDatabase(
  receiptData: purchaseDetails.verificationData.serverVerificationData,
  platform: purchaseDetails.verificationData.source,
  productId: purchaseDetails.productID,
  purchaseId: purchaseDetails.purchaseID,
);

if (databaseResult.data == null) {
  _clientLogProvider.insertClientLog(ClientLogModel(
    requestData: databaseResult.requestData?.toString(),
    response: databaseResult.response?.data.toString(),
    errorMessage: databaseResult.errorMessage,
  ));

  showSnackBar(
    context: context,
    message: databaseResult.errorMessage!,
    type: ContentType.failure,
  );
  _setSavingTransaction(false);
  return;
}

final userNotifier = Provider.of<UserNotifier>(context, listen: false);
final refreshToken = userNotifier.refreshToken;
final response = await _wordpressAuthProvider.refreshToken(
    refreshToken: refreshToken,
  );

if (response.data == null) {
  // handle the case where the refresh token response did not arrive
}

await userNotifier.setToken(
  token: newUser.token!,
  refreshToken: newUser.refreshToken,
);

await userNotifier.setUser(
  newUser.copyWith(
    token: null,
    refreshToken: null,
  ),
);
Node.js backend: platform-specific verification
On the App Store side you will see that the verifyReceipt method is deprecated. So, as Apple's developer docs recommend, we should verify with the App Store Server API. The in_app_purchase 3.2.3 changelog shows that in_app_purchase_storekit version 0.4.0 uses StoreKit 2. So the receiptData of purchases is now in JWS format, not base64. Even if we wanted to, we can't verify the receipt data by sending a request to https://buy.itunes.apple.com/verifyReceipt. On the Play Store side we can verify with the googleapis package. The links will give you an idea of how to use them. To use the verification services on the Apple side we need things like the Apple key id, issuer id, bundle id, subscription key, environment and certificates. For Node.js you can use the package I mentioned at the start (@apple/app-store-server-library). Alternatives for other languages exist, and you can find them online.
iOS verification endpoint
router.post("/payment/ios", [verifyUserToken, validatePaymentInfo()], async (req, res) => {
  const { receiptData, platform, appVersion } = req.body;

  // Verify with the Apple Store Server Library
  const transactionResult = await appleStoreService.verifyAndDecodeTransaction(receiptData);

  if (!transactionResult.success) {
    return res.status(400).json({
      message: `Transaction verification failed`,
    });
  }

  // Save to the database
  const query = `CALL ${insSubscriptionProcName}(?, ?, ?, ?, ?, ?, ?, ?, ?, ?)`;
  await connection.query(query, values);
});
Apple Store service class
class AppleStoreService {
  constructor() {
    this.keyId = process.env.APPLE_KEY_ID;
    this.issuerId = process.env.APPLE_ISSUER_ID;
    this.bundleId = process.env.APPLE_BUNDLE_ID;

    // Apple Store Server API Client
    this.client = new AppStoreServerAPIClient(
      this.privateKey,
      this.keyId,
      this.issuerId,
      this.bundleId,
      this.environment
    );

    // SignedDataVerifier - needs the Apple Root Certificate
    this.verifier = new SignedDataVerifier(
      rootCerts,
      true,
      this.environment,
      this.bundleId,
      this.appAppleId
    );
  }

  async verifyAndDecodeTransaction(signedTransactionInfo) {
    const decodedTransaction = await this.verifier.verifyAndDecodeTransaction(
      signedTransactionInfo
    );

    return {
      success: true,
      transaction: decodedTransaction,
    };
  }
}
Android verification endpoint
router.post("/payment/android", [verifyUserToken, validatePaymentInfo()], async (req, res) => {
  const { productId, purchaseId, receiptData } = req.body;

  // Verify with the Google Play Developer API
  const response = await playDeveloperApi.purchases.products.get({
    packageName: packageName,
    productId: productId,
    token: receiptData,
  });

  // Check the purchase state (0 = purchased)
  if (response.data.purchaseState !== 0) {
    return res.status(400).json({
      message: "Google Play purchase could not be verified",
    });
  }
});

// googlePlayService.js
const { google } = require("googleapis");
const path = require("path");

const keyFilePath = path.join(__dirname, "./xx-project-xx.json");

const playDeveloperApi = google.androidpublisher({
  version: "v3",
  auth: new google.auth.GoogleAuth({
    keyFile: keyFilePath,
    scopes: ["https://www.googleapis.com/auth/androidpublisher"],
  }),
});

module.exports = { playDeveloperApi };
Security and best practices
- Apple Root Certificate: always use the current certificate.
- Environment check: separate production from sandbox.
- Duplicate transactions: prevent the same transaction from being processed more than once.
- Error logging: log all errors in detail.
- Token validation: verify the user's token on every request.
- Token management: reflect changes in user state in the token.
- Error monitoring: notice possible errors early and act on them.
If something here looks wrong to you, leave a comment and I'll update the post.